Scraping and Graphing the Web with Python: Part 1


Going to the gym is probably something most of us could do more often, myself included, but I hate going when it's busy. I prefer to focus on my workout rather than waiting around to grab the next free bench.
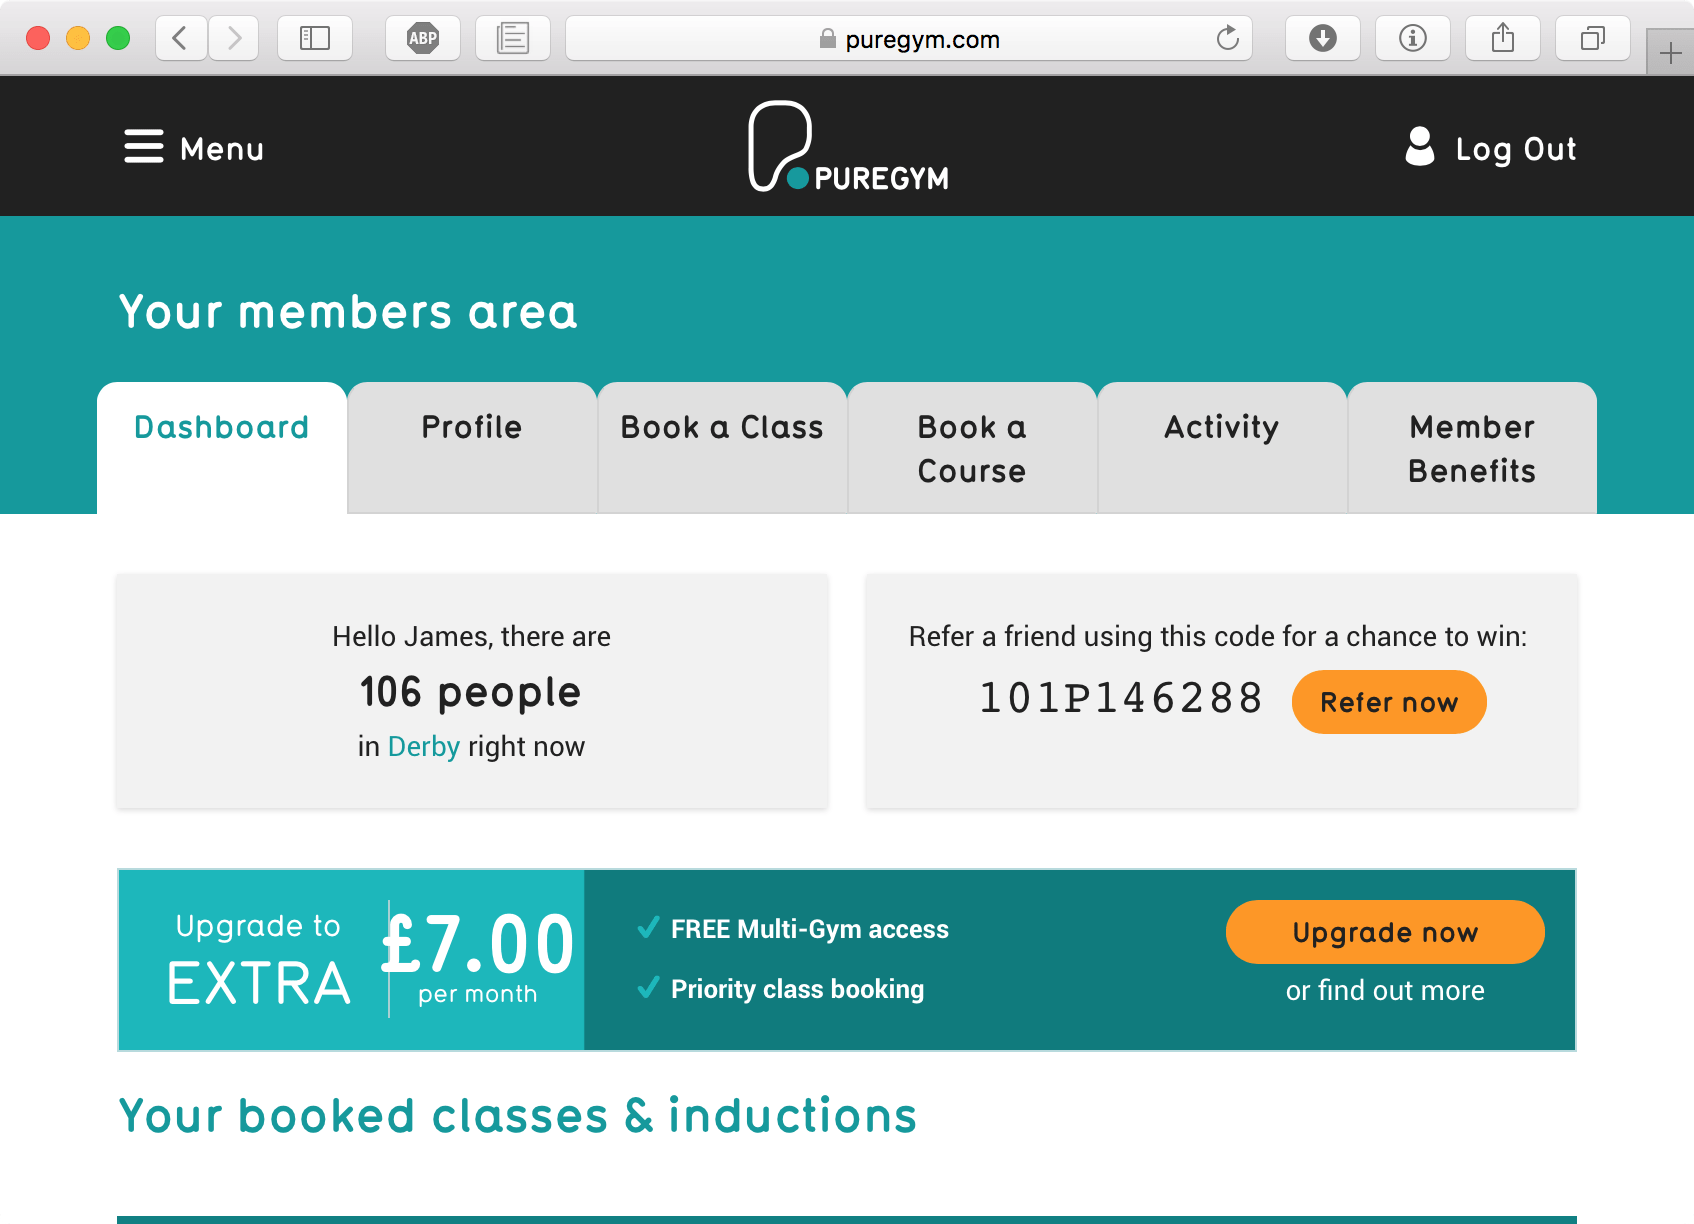
Luckily, my gym provides an indicator on their website as to how many people are currently there which I suspect is quite accurate due to their electronic entry/exit system. However, I've been thinking for a while that it would be so much better if I could see at exactly which times the gym gets busy on each day with a nicely presented graph so I could simply plan accordingly.
I've got access to the data, so what else is there to do but to break out VSCode, fire up a Python virtual environment and make it happen, so let's get to it!
Roadmap
It's always good to plan out a project, even if it's only small, so we have a rough roadmap to work to. Here's the plan:
- Part One: Log-in and Scrape the Page to Collect the Data (This post!)
- Part Two: Persisting Data to Disk
- Part Three: Display the Data nicely via a Web Interface
- Encore: Deploying the App
Each part will be its own post so I'll update the roadmap as new parts become available.
Note: This is not as much of a follow-along tutorial as it is documentation of my development process. You're welcome to try follow along but it does require a PureGym subscription. Alternatively, code is available on my GitHub.
Getting Started
So, we need to be able to scrape the raw data. There's no API available here so we're going to have to get the information we need from the members dashboard page HTML. To do this, we'll need to be able to login using an account and persist the session.
Python 3 makes all of this relatively easy thanks to a few popular packages Requests and lxml. These can both be installed via pipenv(which you should totally be using btw!), simply create an empty project folder, cd into it using your terminal and run pipenv install requests lxml. We'll start by creating a new file called purescrape.py, importing the packages we need and doing some basic boilerplate.
import requests
from lxml import html

def main():
# Do something cool
print("Hello World!")

# Entry point
if __name__ == '__main__':
    main()
Go ahead and run pipenv shell then python purescrape.py and you should get a 'Hello World!' message.
A Little Reconnaissance
The first obstacle to tackle here is the login page, so let's take a look at what we're dealing with and get an idea of what we need to do to login.
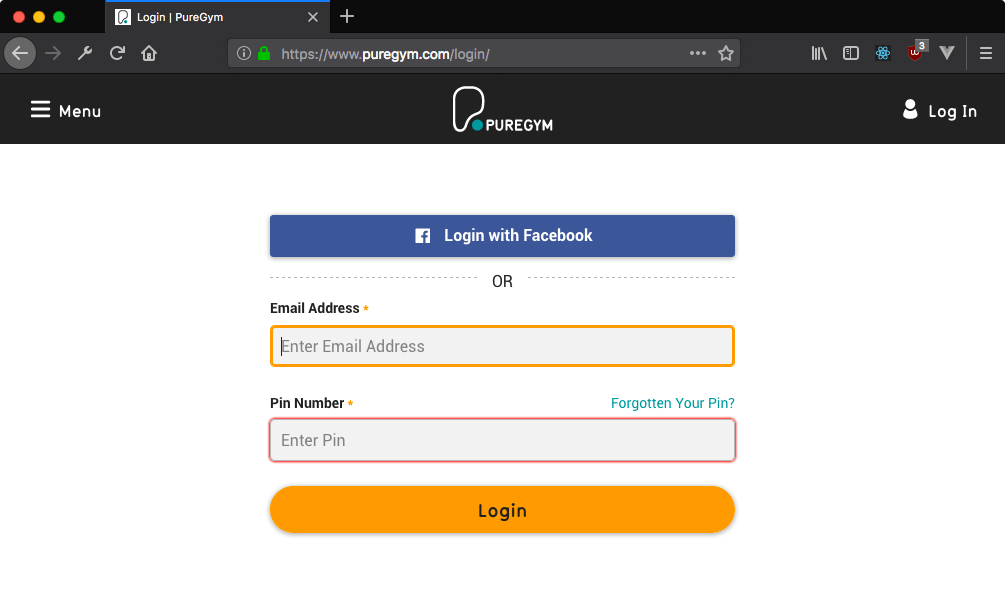
We're going to need to supply the email address and a pin number (i.e. password) to this login form. To do this, we'll generate a request in our script that masquerades as a normal login so the PureGym server thinks its receiving a request from a browser. Before we get to that though, we need to find out what the normal requests actually look like.
To do this, we're going to be using our browser's developer tools. I'm demonstrating with Firefox Developer Edition so that this tutorial is accessible to Mac, Windows and Linux users, (plus the dev tools in Firefox rock!) but if you use Chrome or Safari, the process is roughly the same.
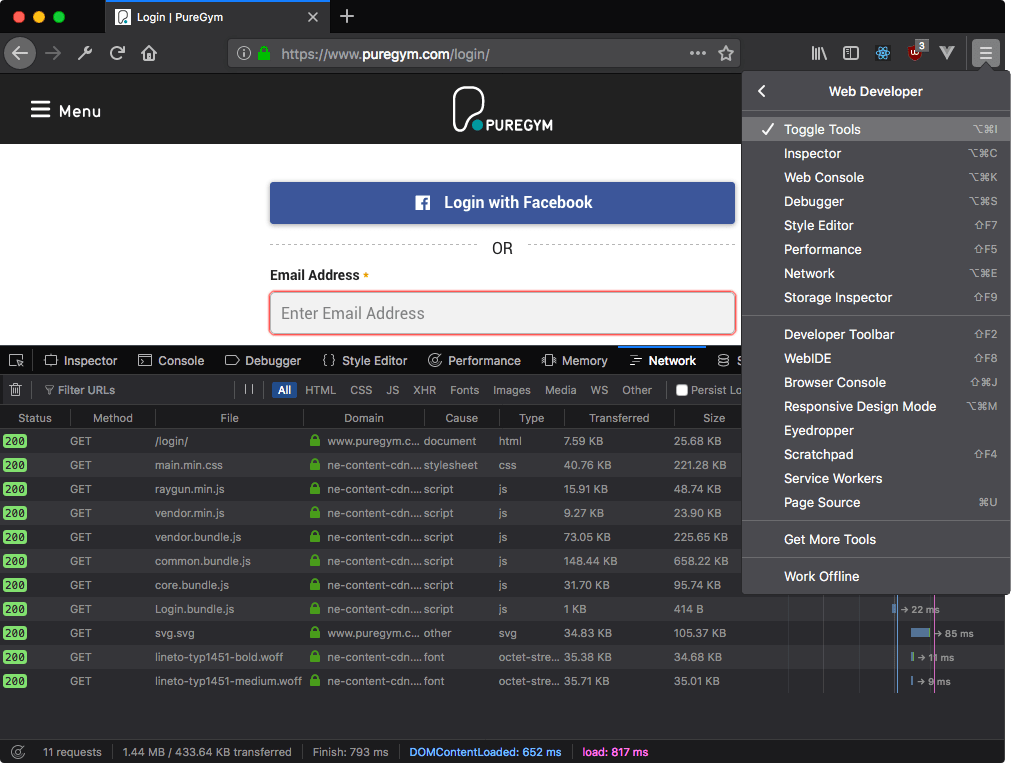
Open the Firefox menu and go to 'Web Developer' then 'Toggle Tools'. Make sure you have the 'Network' tab selected once the dev tools open up, then go ahead and reload the page. You should see the network tab fill up with requests. We're not interested in any of these as they're all GET requests as you can see in the method column.
Since we're interested in what happens when we try to login, go ahead and fill some bogus data into the form. The form uses HTML5 validation so you'll need to make sure the email address format is valid (even if you use a bogus address) and that there's something in the pin field. Clicking 'Login' will show an error on the website since we used bogus login info, but you'll notice that another request has been added to our network tab and that this time, its method is POST!

Clicking on the POST request will bring up another pane with information about the request. Under the 'Headers' tab there's a few things we need to note. Firstly, the Request URL which is the address we'll be sending our request to. Next, take a look below at the Request Headers section. There are various different values here that we'll be using but the first important one is __RequestVerificationToken.
Verification Tokens
Verification tokens, sometimes called authentication tokens, are used to try ensure that the request that the server receives isn't being forged. The token is a unique value embedded in the HTML on every page load and then included in the POST request to 'prove' that the request came from someone using the web page. No token in the request and the server won't play ball.
However, this is not going to stop us! All we need to do is make sure we get a valid token before making a request.
Step 1 here is finding the token because it will be different for every web page. There's no standard way to define a token but it will be hidden away in the page HTML somewhere, so click on the Dev Tools Inspector tab and get looking! In our PureGym example, the token is hidden away in a form input element right at the top of the page body. Hiding in plain sight! You can make this easier on yourself by using the Search HTML box to search for the token that you can copy from the network tab.
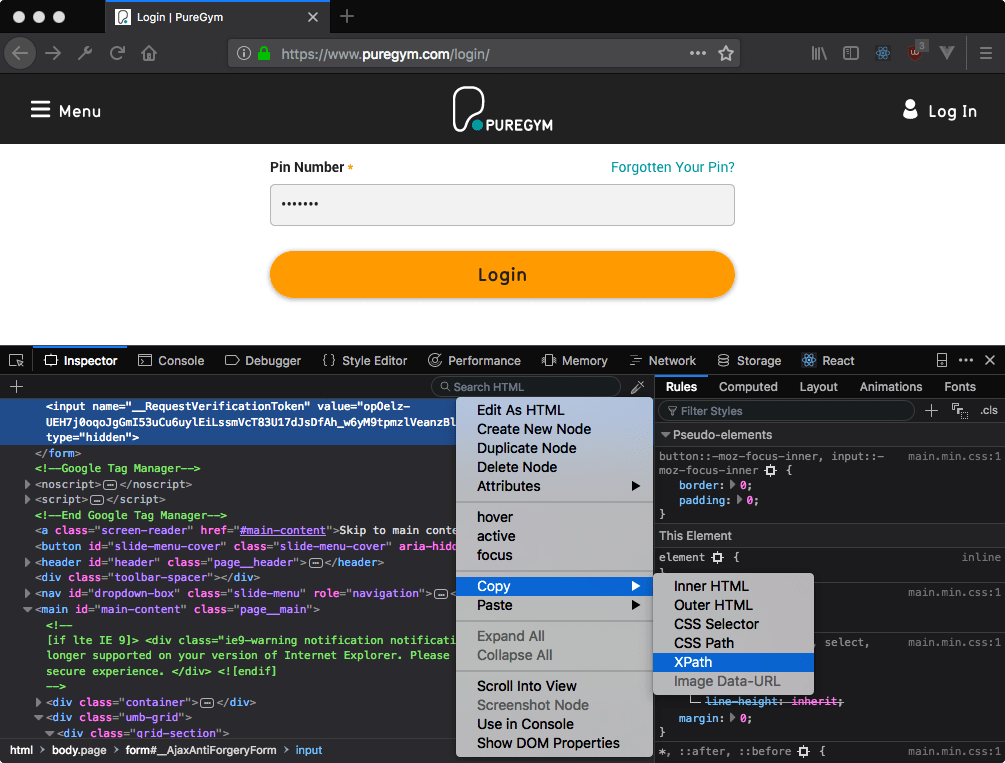
Once you've found the token, right-click on the element it is contained within, choose Copy XPath and paste the result somewhere for safe-keeping.
Wait a minute! What the heck is an XPath?! You might not have come across XPath if you haven't worked with XML before, but we're going to be using it to figure out which section of our page contains the token element. We'll come back to this shortly!
Making our First Request
Okay, time to get down to business here! Let's create a session using our Requests module so that we can log in and remain logged in. Add the following to main():
def main():
    session_requests = requests.session()
Next up, we need to make the first request to GET the login page (so we can start searching for that pesky token!). We use the session_requests object we just created to get the login page and store the result in a variable. Notice that we've defined the LOGIN_URL and LOGIN_API_URL at the top of the file so that we can refer to them by these names. This is optional but makes your code look neater and is easier to change should you need to in future.
LOGIN_URL = "https://www.puregym.com/login/"
LOGIN_API_URL = "https://www.puregym.com/api/members/login/"

def main():
    session_requests = requests.session()
    result = session_requests.get(LOGIN_URL)
If you were to print out result.text now, you'd see the entire HTML of the login page, cool! We need to sift through that HTML and find the element containing the verification token and we'll be using lxml's HTML parsing tool to create a tree that we will then be able to work directly on. Add the following onto your main:
tree = html.fromstring(result.text)
Following the XPath
Now we have our HTML tree, we need to identify the verification token using the XPath we copied earlier. This part is going to take some experimentation if you're following this tutorial to scrape another website, but I'll do my best to explain.
veri_token = tree.xpath("/html/body/form/input/@value")[0]
You can see the XPath that we copied earlier from the browser and we've just added /@value to return the value atrribute. Alternatively, we could do something like //div[@class="my-class"]/text() to return the text of a <div> element, with class="my-class". XPath is super flexible and there's far more than I could cover here, but hopefully you'll be able to adapt the code if needed.
We'll be needing to use XPath again shortly, but for now lets move on.
Sending a Login Request
So we have our unique verification token, now we get to login, right?! Well, not quite. We still need to find out what else we need to send along with the token in order to perform the login. Broadly, this will be split into two categories, the headers and payload.
Headers
We've already peered into the headers of the login request and we know that a verification token is needed. However, it's a good idea to include some other headers in there too. Headers give the server information about who is sending the request, such as the user's browser version and OS version. We're going to pretend to be a Mac running Chrome to make sure that everything works as expected - though don't worry, everyone is pretending to be everyone else on the internet anyway.
Add the following to the bottom of our main so we have a header payload:
headerpayload = {
    'User-Agent': 'Mozilla/5.0 (Macintosh; Intel Mac OS X 10_9_4) AppleWebKit/537.36 (KHTML, like Gecko) Chrome/36.0.1985.125 Safari/537.36',
    'X-Requested-With': 'XMLHttpRequest',
    'Host': 'www.puregym.com',
    'Origin': 'https://www.puregym.com',
    'Referer': LOGIN_URL,
    '__RequestVerificationToken': veri_token
}
Payload
We haven't looked at the payload yet, so head back to your browser in the Network tab of the Dev Tools. In Firefox, you'll find the payload under the Params tab, though this may vary with other browsers. Chrome just calls it a payload.

As we can see, the payload consists of JSON data which includes the email and pin as well as an option for associateAccount. We set the payload up as follows:
payload = {
        "associateAccount": "false",
        "email": "[email protected]",
        "pin": "testpin"
}
With that, we have everything we need to put together our login request!
result = session_requests.post(
    LOGIN_API_URL,
    data=payload,
    headers=headerpayload
)
Assuming the request went through successfully, which you can check with result.status_code, we now have the cookie in place to be able to access the members-only dashboard.
As before, we formulate a request, create a tree from the results and traverse it for the information we want. The XPath is unfortunately much more complex here due to the nested divs without reasonably unique identifiers, but follows the same logic as before.
# Scrape dashboard
url = 'https://www.puregym.com/members/'
result = session_requests.get(
    url,
    headers=dict(referer=url)
)
tree = html.fromstring(result.content)

# Extract current person count from html tree
xtree = tree.xpath(
    '//*[@id="main-content"]/div[2]/div/div/div[1]/div/div/div/div[1]/div/p[1]/span/text()'
    )
Finally, we just need to extract the number of people from our string. The string is typically in the format '45 People', though can change to 'Fewer than 20 people' or '100+ People' meaning we need to handle all these cases. The easiest way to do this is just to use a regular expression (making sure to import Python's re module) to pull out the numbers:
people = int(re.findall('\d+', xtree[0])[0])
We now have a simple app which performs a login, persists the session to scrape another page then returns to us an integer of the number of people currently in the gym. It's not much use so far, but in the coming parts of this series, we will look at how we can store this data every 10 minutes and then how we can represent the data in a user-friendly format.
Thanks for reading and see you in the next one!
Cover Photo by Paul Gilmore