Ghost on DigitalOcean with Ubuntu 16.04
Get started using the powerful Ghost blogging platform on a DigitalOcean Ubuntu 16.04 VPS with this step-by-step installation and configuration tutorial.


Get started using the powerful Ghost blogging platform on a DigitalOcean Ubuntu 16.04 VPS with this step-by-step installation and configuration tutorial.
Please note that Ubuntu 18.04 is not yet supported for Ghost but these instructions may still work for you
Ghost 1.0 stable dropped mid 2017 with ton of great new features such as a redesign to the default Casper theme, a new extensible editor to replace the previous Markdown editor as well as an official Ghost OAuth login system.
There are also some pretty significant changes under the hood with much of the codebase having been rewritten, optimisation towards MySQL as the default production database as well as a MUCH simpler installation and upgrade process compared with previous versions. Despite the installation process being much more manageable now, there's still no 'One Click' droplet image for the 1.x version (even if there was, it takes all the fun out of learning this stuff yourself!) so this post is going to serve as a step-by-step setup guide to get you up and running securely with Ghost 1.x on DigitalOcean using Ubuntu 16.04 or lower. These instructions apply to MacOS but should work equally well on any *NIX system. Windows 10 users can install the Linux Subsystem and use that to follow along.
1. Preparations
You're going to want to make sure you're logged into your account over at DigitalOcean and if you don't already have an account you can sign up for one with $10 free credit here which will run your blog free for 2 months. Students can check out the Github Student Developer Pack for $50 in free credits as well as a whole load of other goodies!
Next you're going to want to set up an SSH key with your DO account which is the recommended way to login to your droplets so I'd strongly suggest setting one up before proceeding if you haven't done so already as this guide is going to assume you have one. DigitalOcean have written great guide for you to follow on How To Use SSH Keys with DigitalOcean Droplets (you'll only need to follow it until step 3, then you can resume this guide).
2. Creating your Droplet
Spinning up your droplet is nice and easy but we'll cover it here to be sure. From your DigitalOcean control panel, click on Create -> Droplets.
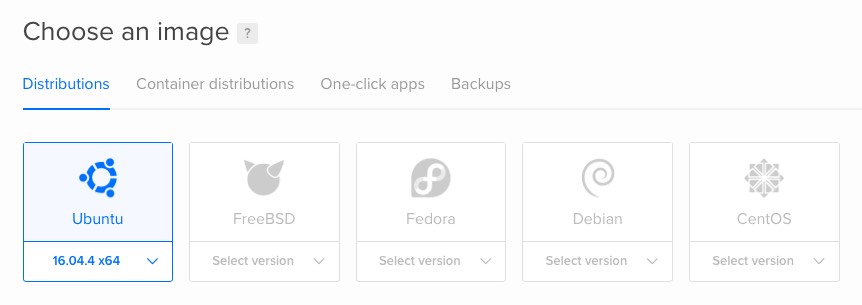
Under 'Choose an image' you'll want to select Ubuntu from the Distributions tab and ensure that you've selected version 16.04.x x64 from the dropdown menu. There may be newer versions of Ubuntu available by the time you read this but this version is the Long Term Support edition (LTS) meaning it'll be supported with security updates for a much longer period than non-LTS releases and is the only version officially supported by Ghost.
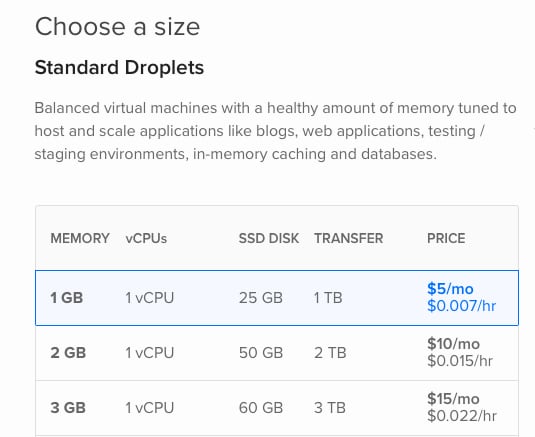
Scrolling down, your next option will be the droplet size. This is going to depend on how much traffic you expect to get to your blog. It's perfectly reasonable to run Ghost on the smallest 1GB droplet for $5 per month (this guide will assume you are) but if you expect you might get quite a lot of traffic and want a little extra headway, you might want to consider a larger option - though this change is made easily enough down the road.
Scroll down, ignoring the block storage option (and anything else that might be there in future) until you reach the region selection area. Here you're going to want to choose the region that is either closest to you, or closest to those who you expect to be visiting your blog. For example, if you're aiming your posts at a European audience, it makes little sense locating your server in Bangalore as the increased latency will make your site load slower for European users.
The additional options section is entirely up to you. You can hover over each option to get an explanation of what they all do. I'd recommend enabling backups for a monthly cost of 20% of your droplet price. It's a small amount to pay for the peace of mind should anything go wrong. I'd also recommend the free monitoring option which will give you deeper insights into resource usage on your server from the DigitalOcean control panel.
If you took notice earlier and created an SSH key (You didn't? Go back and do it!), make sure to tick the box next to the relevant key so it'll be installed on your server automagically for you.
Finally, choose a name for your droplet (or leave it as the default) and hit that big create button to get the ball rolling!
While you're waiting for things to get up and running, this is a great time to configure your custom domain to use later on so that the DNS changes have time to propagate. DigitalOcean's 'How To Set Up a Host Name with DigitalOcean' tutorial covers everything in more detail than I would want to so I'd advise you follow that before returning here. Put briefly, you'll probably want to point your domain at DigitalOcean's nameservers, then create an A record pointing to your new droplet.
3. Connecting and Creating a New User
Now it's time for the moment of truth! Once your droplet is up and running (should only take ~30 seconds normally), go ahead and make a note of the IP address for it from the DigitalOcean control panel.
Head into your Terminal app and type in the following (replacing 1.2.3.4 with the IP address you just noted down):
ssh [email protected]
You might get a warning message about the key since we haven't used it before, accept this and you'll be presented with the command line for your brand new droplet!
Out of the box, Ubuntu needs a little bit of work to secure it as well as to install some prerequisite software before we install Ghost.
The first thing to take care of is creating a new user. The default user account of root is privileged and has complete access to the system so it's strongly advised that you don't use it for day to day administration, so it's sensible to create a new user. Go ahead and run the following command replacing username with a name of your choice (the only name you can't use is ghost as we'll be using that later), choosing a secure password and filling in any of the options you want to:
adduser username
We now need to give this account the ability to raise it's privileges when required for certain administration tasks, rather than having to login as the root user. We can do this by by running the following (again, replacing username):
usermod -aG sudo username
At this point, we need to copy your SSH key from your local machine (as it's only set up automatically for the root user) so that we can easily login to this new user. Either open a new terminal window or type exit to close the connection so that we can run the following command on your local machine:
cat ~/.ssh/id_rsa.pub
This will print out your local public SSH key which should look something like the following:
ssh-rsa AAAAB3NzaC1yc2EAAAADAQABAAABAQC60nSM5a00qmMu2P1G+en/sG8fBLLClnQDaipvhUTE8UrwjniyyK67Ipm5Kag9Aa3u9rbLiS2qYJrMcUJvQ3PsJGGtpfNeF9oNDVh8c9kJ0KrcBh8lTgnaqO4ACYLT9DgPOtPXkNC/kHirwv9mvZJf5DoNqkREQqEW6c107JfHaxbXKL0HKjaFwsjmdeYZBiw6P3y22IaOhN1vx4qOUKQvFNguM8Q4aU4flWL0M8OwFsr1XRtc7qpUZxOUk9etcs2DkUhdc1fzXCXe0tFwLoxCs+gTkfMAspmuaO7KTxJ88HagxhJUx+QABnQqQkXudeMAra84uPyarNlZsJVB0f37
Copy the key to your clipboard and log back into your server as the root user (just as we did before). Then, switch to the new user you created (subbing in the username you chose):
su - username
As you're now in the home directory of the new user, create an .ssh directory, restricting its permissions to 700 and then opening a new file with the name authorized_keys inside this new folder:
mkdir ~/.ssh
chmod 700 ~/.ssh
nano ~/.ssh/authorized_keys
Paste in the public key you copied from your local machine and save the file by pressing Ctrl+X and then responding with Y when asked to save.
The final step is to restrict permissions on authorized_keys:
chmod 600 ~/.ssh/authorized_keys
You can now type exit to revert back to the root user then again to close the connection.
Now, the moment of truth. If you've done everything correctly, you should be able to login as the new user by doing:
ssh [email protected]
If that worked, you're ready to move on to the next step! If it didn't work, log back in as the root user and follow the process again to copy your public key making sure you copy the entire thing.
Security Note: DigitalOcean disables password login out of the box if you opt to install an SSH key at the point of Droplet creation. This guide assumes you did this, however if you didn't install an SSH key this way then you'll want to disable password login for security.
4. Setting up the Firewall
Out of the box, Ubuntu's firewall known as UFW is not active. It's good practice to enable it and only allow connections to and from applications that we pre-approve to add another layer of security to our Droplet.
This is really simple to do though we'll need to remember to use the sudo command to execute the command with root privileges without the need to login as the root user. First, it's a good idea to check which applications have registered themselves with UFW so that we can manage them by name:
sudo ufw app list
You should now see that OpenSSH is listed under available applications. We're going to need to allow OpenSSH through the firewall so that we're able to login successfully:
sudo ufw allow OpenSSH
This is all it takes to allow connections for OpenSSH so we can go ahead and enable UFW:
sudo ufw enable
We can check that UFW has been enabled and that OpenSSH connections are allowed:
sudo ufw status
This should give you an output as below, showing that UFW is active and that OpenSSH is allowed from anywhere. The two entries relate to IPv4 and IPv6 respectively.
Status: active

To                         Action      From
--                         ------      ----
OpenSSH                    ALLOW       Anywhere
OpenSSH (v6)               ALLOW       Anywhere (v6)
We'll be revisiting UFW later when we need to allow other applications through the firewall but for now, this is all we need to do.
5. Installing Prerequisite Software
Ghost requires that a few pieces of software be installed in order for it to run, namely MySQL for the database, NGINX for the webserver and Node.js as the platform that Ghost runs on.
We'll start by updating our package lists and applying any upgrades in order to get our Ubuntu installation up-to-date with security and application bug fixes as well as making sure that we're installing the latest versions of the software I mentioned above. Run the following commands, one after the other:
sudo apt update

sudo apt upgrade
This might take a few minutes depending on how many updates need to be applied, but wait for the process to finish before moving on.
NGINX
NGINX, if you're not already familiar with it, is a high performance web server commonly used as a proxy between Node.js application servers and the outside world. NGINX is highly configurable and able to scale to handle many thousands of connections but this tutorial won't get into that.
Install NGINX by running:
sudo apt install nginx
Once the installation has completed, we'll need to allow NGINX through the firewall that we set up earlier so that it can serve webpages to users. This is achieved with the following:
sudo ufw allow 'Nginx Full'
It's worth noting that by specifying 'Nginx Full', UFW sets up rules to allow both insecure HTTP connections as well as secure HTTPS connections. If you plan on using both then this is fine, however if you want to restrict the system to use one or the other only, then you can specify 'Nginx HTTP' or 'Nginx HTTPS'. If you're not sure, just go with the Full option.
MySQL
Next we'll install MySQL, the database engine. It's an industry standard relational database system so it's more than capable of managing a few hundred blog posts.
As before, install MySQL with:
sudo apt install mysql-server
After MySQL is done installing, you'll now need to do some basic setup to make it secure:
sudo mysql_secure_installation
You'll then be asked the following questions:
- Would you like to enable the validate password plugin? - You can answer
No - Please set a root password - Enter a hard to guess password and note it down for later!
- Remove anonymous users? - We definitely don't want this so answer
Yes - Disallow root login remotely? - This is a good idea in most cases so answer
Yes - Remove test database? - We don't need it so answer
Yes - Reload privilege tables? - Answer
Yesto apply the changes you just made.
We don't need to do anything with the firewall for MySQL as it doesn't need to be accessible outside of our droplet.
Node.js
The final prerequisite is Node.js, a Javascript application runtime environment built on top of Google Chrome's V8 Javascript engine. It's become a popular choice in recent years given the rise of Javascript on the web.
Node.js development has been progressing pretty rapidly meaning that there are two major point releases each year, one of which is transitioned into Long Term Support. Whilst we could try run Ghost on the latest and greatest Node release, it'd probably be a difficult experience filled with incompatibility issues as it's not officially supported. The Ghost team recommend using the latest Node.js 6.x LTS version as this is what they test Ghost releases with most heavily. I personally opted to run on Node.js 8.x LTS as the Ghost team does support this version and will likely become the recommended version at some point this year. I would not recommend using the newly released 10.x version yet for Ghost.
Which version you use is up to you, though I've experienced no issues using 8.x and have the peace of mind that it'll be supported further into the future.
We need to add the NodeSource repository before we can install Node.js because the versions available in the default Ubuntu software repository are always badly out-of-date:
curl -sL https://deb.nodesource.com/setup_8.x | sudo -E bash
If you prefer to use Node.js 6.x, just make that you change the URL to setup_6.x. Then run the install command:
sudo apt install nodejs
Congratulations, we now have all the software we need to get Ghost installed!
6. Ghost Installation
This step is relatively easy and you won't need much help even if you're a total beginner. The Ghost team have done an awesome job creating an installer that sets everything up for you if you let it.
Begin by installing the Ghost-CLI (Command Line Interface) tool globally:
sudo npm i -g ghost-cli
Once this process completes, you'll have access to a new command ghost. Before we go ahead and use it, we need to create a folder for the installation to live in:
sudo mkdir -p /var/www/ghost
Next, we need to change the ownership of this new directory to your user (as ever, replacing username with your own):
sudo chown username:username /var/www/ghost
Move into the new directory:
cd /var/www/ghost
And finally, the moment you've been waiting for! Fire up the Ghost installer and follow it through:
ghost install
You'll be asked firstly for your blog URL. You should have already configured the domain you want to use way back at the end of step 2. If you want to secure your blog - something I'd highly recommend, then you'll need to make sure you use the https:// prefix, e.g. https://mydomain.com. However, your domain will need to already be resolving to set SSL up, so make sure that you can see the 'Welcome to NGINX' page when you visit your domain. If you can't see this page, that likely means your domain hasn't resolved properly yet so use the http:// prefix for now, you can set up SSL later easily with the ghost config url https://mydomain.com && ghost setup ssl command.
When asked for the MySQL hostname, leave this as the default of localhost. The MySQL username is root and the password is the password you created when we installed MySQL. The database name, leave as default unless you really have a desire to change it.
The installer will then try set up a Ghost MySQL user which is a very wise idea, so I'd strongly advise accepting this. You'll be asked if you want to configure NGINX, accept this unless you want to create a custom NGINX config.
SSL is the next option, powered by the fantastic Let's Encrypt service. It's a great idea to do this as it's so easy, has relatively no performance impact and will benefit your users as well as your search engine ranking.
Finally, allow Ghost to set up systemd so that your Ghost blog will start up automatically when your server boots without the need to manually restart it.
If you've made it this far, the installer will now attempt to start your Ghost installation. Fingers crossed, everything went okay and your blog is now accessible at the domain you specified!
Visit yourdomain.com/ghost to set up an admin account and get started!
Hope you enjoyed reading this tutorial. Any questions, hit me up over on Twitter or in the comments!
Photo by Shoot N' Design on Unsplash